
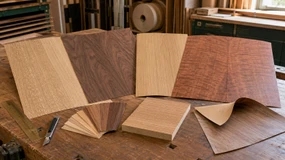
Short answer: Match five choices to your project, then verify install conditions. Choose the grain pattern by cut, pick a species that fits your look and environment, set a workable backing and thickness, and select an appropriate grade for visibility. Finally, acclimate sheets 48 to 72 hours and keep the shop at 55 to 85°F with 30 to 55% RH before bonding for a stable result. See the WiseWood Veneer FAQ, Hartco wood floor acclimation guide, and WiseWood installation instructions for more details.
This 10-step guide structures every decision so you avoid common veneer failures and overspending. You will see how cut type drives the look, why backer thickness matters on imperfect substrates, and how grade selection can optimize material use in semi-visible areas without sacrificing quality. For more, see ROBAM Living's material comparison. Throughout, we reference Total Wood Store options and real-world scenarios so you can specify confidently and order with clarity.
Key Takeaways
- The cut defines the look more than the species. Rift cutting angles the blade 15 to 30 degrees to minimize ray fleck in oak, creating tight, linear grain (see Oakwood Veneer's guide to veneer cuts).
- Stabilize the environment first. Unroll veneer and rest it flat for 48 to 72 hours, maintain 55 to 85°F, and keep RH at 30 to 55% for reliable bonds, as explained in the WiseWood Veneer FAQ, Hartco's acclimation resources, and WiseWood's installation instructions.
- Optimize material use where visibility is low. Substituting Premium with Cabinet Grade can reduce veneer costs on semi-visible surfaces (see ROBAM Living's comparison).
Understanding Wood Veneer Sheets: What You're Actually Buying
Real wood veneer sheets are thin slices of actual timber, generally 0.5 to 3.0 mm thick, that are peeled or sliced from a log and bonded to a stabilizing backer, as described in Alibaba's buying guide. Unlike printed laminates, veneers keep the natural cellular texture and unpredictable grain of real wood.
A typical sheet has three parts: the face veneer, a backing material, and the adhesive system used during installation. Backings make a fragile wood leaf workable and help control movement, glue seepage, and telegraphing from the core. Veneer lets you cover large areas with high-grade wood while using efficient cores, delivering significant cost and sustainability advantages compared to building the same surface from solid lumber.
Common misconceptions include assuming veneer is fake or weak. Properly specified backers and adhesives yield durable, professional surfaces that finish like solid wood. Veneer also maximizes log yield by turning a single premium log into many square feet of surface, which supports resource efficiency.
Step 1: Identify Your Project Type and Requirements
Start by defining where and how the surface will live. Functional, high-traffic zones like kitchen cabinetry or bar tops demand tougher backers and finishes than decorative wall panels.
In high-moisture areas, use phenolic-backed veneers or well-sealed 2-ply veneers with waterproof PVA or epoxy adhesives for maximum stability, as detailed in LedgeBand's guide to veneer backing types and ROBAM Living's material comparison.
Consider geometry. Raw or 10-mil paper-backed veneers can bend to tight radiuses of about 1 inch, which makes them ideal for wrapping columns or curved aprons, as explained by FormWood. Match the substrate to the backing. Smooth cores like MDF often accept thinner backers, while refacing older, textured surfaces benefits from thicker stabilization layers.
Quick assessment checklist
- Application: cabinetry, furniture, wall panels, millwork, restoration
- Environment: dry or humid, exposure to splashes or steam, UV exposure window-side
- Visibility: close-up premium zone or interior/utility zone
- Substrate: MDF, plywood, particleboard, or existing casework condition
- Skills and tools: contact cement, vacuum press, or PSA-only approach
Step 2: Choose Your Veneer Cut Type (This Determines Grain Pattern)
Select the cut to define the visual first. The same species looks dramatically different by cut. Plain sliced shows cathedrals, quartered is straight-grained and can expose ray fleck in oak, rift suppresses flake for ultra-linear grain, and rotary yields wide, bold, non-repeating patterns. See Oakwood Veneer's overview of veneer cuts and Construction Specifier's tips for more.
Rift cutting slices the log at a 15 to 30 degree angle relative to the medullary rays to minimize flake, which produces a tight, parallel grain prized in modern work (see Oakwood Veneer). Rotary cutting peels the log like paper, so the figure can be broad and economical for large surfaces, as described by Modlar.
Cut type quick-compare
| Cut type | Visual | Typical use |
|---|---|---|
| Plain Sliced | Cathedral center, straighter edges | Doors, furniture fronts |
| Quartered | Straight, uniform lines, ray flake in oak | Formal cabinetry, panels |
| Rift | Tight, parallel lines, minimal flake | Modern minimalist looks |
| Rotary | Broad, non-repeating figure | Large areas, economy |
Example: Specify Rift Cut White Oak when you want sleek, linear grain without oak flake for modern kitchens. For traditional cathedrals, choose Plain Sliced.
Step 3: Select Your Wood Species (Balancing Aesthetics and Performance)
After you lock the cut, choose the species that fits your color and environment. Total Wood Store stocks core species that cover a wide design range. White Oak brings natural moisture resistance, which makes it a smart choice for kitchens and baths. Red Oak offers a warm domestic look. African Mahogany adds rich ribboned character in premium millwork. See Total Wood Store's White Oak Quartered, Red Oak Quarter, and African Mahogany Quartered product pages for examples.
For projects that require perfect sheet-to-sheet consistency, consider engineered or reconstituted veneers. These products are made from sustainably harvested wood fibers, dyed and re-sliced to emulate premium looks with repeatable color and grain, an advantage on large installations, as noted by Paxton Wood's Echo Wood line.
How to decide among available species
- Target color: White Oak for light to medium tan, Red Oak for warmer red-browns, African Mahogany for deeper, classic tones.
- Texture and pores: Oak’s open pores deliver pronounced grain, Mahogany’s ribbon figure reads refined in quartered cuts.
- Finish plan: All finish like solid wood. Test on a sample for color, pore fill, and sheen before you commit.
Step 4: Determine the Right Veneer Thickness
With backed veneers, thickness usually refers to the backer in mils. A 10-mil paper backer yields a total sheet thickness around 0.022 to 0.025 inches, which remains flexible for curves, as explained in Oakwood Veneer's backer information. Raw or 10-mil paper-backed veneer can bend to about a 1 inch radius without fracturing, useful on columns and tight contours, according to FormWood.
Heavier backers resist telegraphing on rough cores. A 30-mil paper backer totals around 0.036 inches and is widely used to mask older textures during refacing, making it forgiving for beginners, as described by Edgemate.
Thickness by application
| Backer | Approx total thick. | Typical use |
|---|---|---|
| 10-mil paper | 0.022 to 0.025 in | Smooth cores, curves, tight wraps |
| 20-mil paper | Directionally thicker | Moderate refacing, reduces telegraphing |
| 30-mil paper | ~0.036 in | Refacing textured cores, beginner friendly |
On pristine MDF, 10-mil is efficient. On older plywood or refacing jobs, step up to 20 or 30 mil to hide imperfections.
Step 5: Choose Your Backing Material (Critical for Installation Success)
Backers transform fragile wood leaves into workable sheets and control bond reliability. Choose to match your substrate, environment, and install method. Paper-backed sheets are versatile, available from 10 to 30 mil for balancing flexibility and telegraph resistance (see Oakwood Veneer Backer Info). Wood-on-wood, also called 2-ply, adds cross-grain stability and handles like a thin plywood. Phenolic-backed veneers deliver strong dimensional stability and moisture resistance for demanding sites, as detailed by LedgeBand.
Backing options at a glance
| Backing | Strength | Best use |
|---|---|---|
| Raw veneer | Highest flexibility, skill required | Traditional veneering, complex matches |
| Paper 10-mil | Flexible for curves | Smooth cores, 1 in radius wraps (see FormWood) |
| Paper 20-30 mil | More stable, hides defects | Refacing, older substrates (see Edgemate) |
| Wood-on-wood | Cross-grain stability | Flat panels, easy handling |
| Phenolic | Moisture resistant, durable | Kitchens, baths, commercial |
| PSA (peel-and-stick) | No liquid glue needed | Clean, sealed, dust-free surfaces (see VeneerSupplies) |
PSA saves time but demands a sealed and dust-free substrate to achieve a permanent bond, as explained by VeneerSupplies.
Step 6: Understand Veneer Grading and Quality Levels
Match grade to visibility. Premium faces are selected for uniform color and grain, while Cabinet Grade permits minor natural variation at a significant material savings. Substituting Premium with Cabinet Grade on semi-visible areas can help optimize your veneer use, as detailed by ROBAM Living. Utility grades allow more pronounced characteristics for budget zones.
Example: Use Premium Quartered White Oak on door fronts, then specify Utility-Grade White Oak for interiors to maximize value. See Total Wood Store's White Oak Quartered and Utility-Grade product pages for more.
What defines grade in practice
- Color consistency across the face
- Natural features like pin knots and mineral streaks
- Figure uniformity and absence of splits or rough cuts
Reserve Premium for focal areas like conference tables and wall panels. Use Cabinet or Utility Grade for interiors and backs when visibility is low.
Step 7: Select the Right Sheet Size for Your Project
Plan sizes to reduce seams and waste. The North American standard 4 x 8 ft sheet is widely available, with extended lengths such as 4 x 10 ft for taller panels and fewer horizontal seams (see FormWood). Many suppliers also offer point-of-sale sizes like 2 x 8 ft for smaller builds and repairs (see Edgemate).
Cross-grain options, where the grain runs across the short dimension, can help wrap long horizontals or special features. When you need uninterrupted height, choose extended lengths to minimize splices.
Common sizes
| Size | Use case |
|---|---|
| 2 x 8 ft | Repairs, accents, small projects |
| 4 x 8 ft | Standard casework and panels |
| 4 x 10 ft | Tall walls, fewer seams |
Order enough to account for pattern matching and offcuts, especially when aligning cathedrals or linear grain.
Step 8: Consider Veneer Matching for Multi-Sheet Projects
When a project spans multiple sheets, plan how leaves will align. Book matching flips consecutive leaves like a book for mirrored symmetry. Slip matching places leaves side by side without flipping to maintain a smooth, continuous flow and avoid a barber pole effect. Plank or random matching varies widths for a more rustic look (see Read Veneers and Lenderink for more on matching).
If you need the grain to flow across many panels, request sequence matching so sheets are pulled consecutively from the same log for architectural continuity, as explained in the WiseWood Veneer FAQ.
Where each match excels
- Book match: formal balance on doors and conference tables
- Slip match: clean, linear runs for rift or quartered cabinetry
- Random or plank: casual, varied aesthetic for rustic spaces
- Sequence matched: large kitchens or lobbies that demand sheet-to-sheet flow
Step 9: Budget Planning and Cost Optimization
Several factors affect the pricing of wood veneer sheets. The grade you select has a substantial impact: Premium faces are more expensive due to their uniformity and selection process, while Cabinet and Utility Grades are more affordable because they allow more natural variation. The cut type also plays a role - for example, rotary cut veneers tend to be more economical because they yield more surface area per log, while quartered and rift cuts require more precise processing and may cost more.
Species selection affects price as well. Domestic species like Red Oak are typically less expensive than imported or exotic woods such as African Mahogany. Backing types and thicknesses contribute to cost: thicker or specialty backers like phenolic or wood-on-wood add to the price due to their materials and manufacturing steps. Sheet size can influence cost, with larger or custom sizes generally priced higher due to yield and production requirements.
Installation method compatibility and required adhesives may also factor into your budget, especially if you need specialty products for high-moisture or demanding environments. Planning your project to use higher grades and specialty features only where necessary helps control overall costs.
Where to save vs where to invest
- Save: use lower grades on interiors, select higher-yield cuts for large spans, sample before bulk buys
- Invest: choose moisture-resistant backers for wet zones, thicker backers for refacing, premium faces on focal elevations
Step 10: Verify Compatibility with Your Installation Method
Success hinges on preparation. Unroll sheets and acclimate flat for 48 to 72 hours. Keep the shop at 55 to 85°F and RH at 30 to 55%, as detailed in the WiseWood Veneer FAQ, Hartco's acclimation resource, and WiseWood's installation instructions. Before bonding, ensure the veneer and substrate moisture contents are within 2 to 3% of each other, as explained by Oakwood Veneer.
Select adhesives to match backer and process. Paper-backed veneers are commonly applied with solvent contact cement or pressed with urea or cold-press PVA systems, as described by FormWood. PSA veneers need firm pressure with a scraper and bond best to sealed, dust-free surfaces, as noted by VeneerSupplies.
Install method compatibility
| Method | Recommended backers |
|---|---|
| Contact cement | Paper-backed, PSA not required |
| Vacuum press | Raw veneer, paper-backed, 2-ply |
| Cold press PVA/urea | Paper-backed, wood-on-wood |
| PSA peel-and-stick | PSA-backed over sealed, dust-free cores (see VeneerSupplies) |
Tip: Use a pinless meter and only proceed when substrate and veneer MCs are within 2 to 3% for predictable bonds, as explained by Oakwood Veneer.
Common Wood Veneer Selection Mistakes to Avoid
Skipping acclimation is the number one failure point. If you rush the 48 to 72 hour rest or ignore shop climate, expect bubbles or cupping after cure. See the WiseWood Veneer FAQ and WiseWood's installation instructions for more.
Do not confuse oak figure with cut. Ray flake requires quarter slicing. If you want linear grain without flake, choose rift, where the cut angle shifts 15 to 30 degrees to avoid rays (see Oakwood Veneer). Avoid wrapping tight radiuses with rigid 2-ply or phenolic sheets. Use raw or 10-mil paper-backed that can handle about a 1 inch radius, as described by FormWood. PSA bonds will fail on dusty or raw porous surfaces, so seal and clean first, as explained by VeneerSupplies.
Wood Veneer Selection Checklist: Your Decision Framework
Use this sequence to finalize your spec. Download the PDF checklist from Total Wood Store to capture decisions and quantities before ordering.
- Define environment: dry, humid, or wet zone. If high moisture, lean phenolic or sealed 2-ply with waterproof adhesives, as recommended by LedgeBand.
- Choose the look by cut: Cathedral, Linear, Flake, or Bold. Plain, Rift, Quarter, or Rotary set the pattern (see Oakwood Veneer).
- Select species from available inventory: White Oak, Red Oak, African Mahogany at Total Wood Store.
- Assess substrate and pick backer: smoother cores take 10-mil, rough or refacing favors 20 or 30 mil (see Edgemate).
- Set grade by visibility: Premium for focal areas, Cabinet or Utility where unseen (see ROBAM Living).
- Plan sizes and matching: pick 4 x 8 or 4 x 10 and specify book, slip, or sequence matching as needed (see Read Veneers).
- Plan acclimation and climate: 48 to 72 hours resting, 55 to 85°F, RH 30 to 55% (see WiseWood Veneer FAQ and Hartco).
Sample request tips
- Order at least two cuts of your chosen species to confirm pattern preference.
- Test finish on samples to lock color and pore fill before buying full sheets.
- Ask for sequence-matched availability and lead time when planning multi-panel runs.
How Total Wood Store Simplifies Veneer Selection
Since 1947, Total Wood Store has supported pros and DIYers with deep inventories and practical guidance. Product pages clearly list cut, grade, and backer options with real photos for faster, more confident picks. See examples for White Oak Quartered and African Mahogany Quartered.
You can mix quality tiers to optimize your project, for example pairing Premium door faces with Utility-Grade interiors on the same order (see White Oak Utility-Grade). Need help with matching or sizing? Specialists can confirm sequence-matched options and recommend backers by substrate. Explore sizes from point-of-sale cuts up to standard panels for clean takeoffs at Total Wood Store.
Frequently Asked Questions About Choosing Wood Veneer Sheets
What is the difference between veneer sheets and veneer plywood?
Veneer sheets are decorative wood faces on thin backers meant to be laminated to a core. Veneer plywood is a structural panel with veneer faces already bonded to a plywood core (see WiseWood's explanation of what is veneer).
Can I use the same veneer for cabinets and furniture?
Yes, but match the backer and finish to wear. Kitchens require phenolic or sturdier backers with durable topcoats, while furniture can use 10-mil on smooth cores (see LedgeBand's guide to backing types).
Do I need Premium or Cabinet Grade?
If the surface is highly visible, choose Premium. On interiors, Cabinet Grade can help optimize your budget (see ROBAM Living).
What is best for beginners?
A 30-mil paper-backed veneer is forgiving on refacing and hides minor substrate defects (see Edgemate).
Do I need sequence-matched sheets?
Yes for continuous runs where grain must flow across many panels (see WiseWood Veneer FAQ).
How much extra should I order?
Plan to order additional material for pattern alignment, offcuts, and potential defects in lower grades.
Can veneer be used in high-moisture areas?
Yes with phenolic or sealed 2-ply backers and appropriate adhesives (see LedgeBand's backing types).
What is the shelf life of veneer sheets?
Store flat, out of sun, in a climate-controlled room and acclimate before use for best results.
Next Steps: Start Your Wood Veneer Project with Confidence
Finalize your checklist, then order samples of the exact species and cut you plan to use. Test your finish system on those samples and confirm matching preferences. Consult Total Wood Store specialists to verify grade mixes, backer thickness, and sheet sizes for your substrate and environment. Visit Total Wood Store for support.
Before install, unroll and rest sheets 48 to 72 hours, maintain 55 to 85°F and 30 to 55% RH, and confirm substrate and veneer are within 2 to 3% MC to reduce risk of bubbling or telegraphing. For more, see WiseWood Veneer FAQ, Hartco's acclimation guide, and Oakwood Veneer's advice on acclimation.
Conclusion
Choosing veneer is a series of defensible decisions. Set the grain by cut, then fit species to color and environment. Pick backer thickness for your substrate, assign grade by visibility to optimize material use where it counts, and lock in sheet sizes and matching. Finally, respect acclimation and climate to avoid bonding failures. See ROBAM Living for strategies and WiseWood Veneer FAQ for best practices.
If you want a second set of eyes, our veneer specialists can review your checklist, recommend the right TWS product pages, and confirm sequence-matched availability. Order samples, verify finishes, and build with confidence. Start with Premium Quartered White Oak for focal faces, pair with Utility-Grade interiors, and choose the right backer for your core at Total Wood Store.
References
- Wood Veneer Sheets: Real Wood Buying Guide
- 6 Different Wood Veneer Cuts
- Veneer Backer Information
- Edgemate Wood Veneer Sheets
- Paper Backed Veneer Sheets
- Veneer FAQs
- Wood Floor Acclimation
- Installation Instructions
- Veneer Acclimation by Climate Zone
- PSA Veneer Information
- Wood Veneer Backing Types
- Best Kitchen Cabinet Materials
- Veneer Matching
- White Oak Quartered Veneer
- White Oak Utility-Grade Veneer
- Red Oak Quarter Cut Veneer
- African Mahogany Quarter Sawn Veneer
- Wood Veneer Techniques
- What is Wood Veneer
- Echo Wood Engineered Veneers