
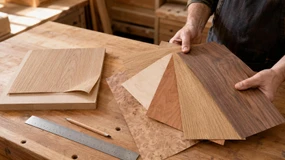
How to Choose the Right Wood Veneer: Complete Guide for 2026
The right veneer starts with the right method. Define the environment and substrate first, then lock in cut, species, grade, and backing. This five-step workflow prevents failures like bubbling and telegraphing, and it aligns your budget with visual goals. Real wood veneer is thin, typically 0.5 to 3.0 mm, so correct acclimation and backer choice matter as much as the species you love.
This guide gives DIYers and pros a complete, research-backed framework. You will learn which cuts shape grain more than species, how grades balance cost and visual quality, and which backers suit your tools and space. We close with sizing tips, application-specific cautions, and a checklist you can download to finalize orders with confidence.
Key Takeaways
- Start with environment and substrate, then choose cut, species, grade, and backer. Skipping acclimation is the top failure cause; let sheets rest 48–72 hours at 55–85°F and 30–55% RH.
- Cut type changes the look more than the species. Rift cutting uses a 15–30 degree angle off quarter to avoid medullary rays, creating straight grain and lower yield.
- Wood veneer is a growing, sustainability-forward choice. The global market is $5.08B in 2026 and projected $7.9B by 2035; 37% of LEED projects used sustainable veneers in 2023.
Understanding Wood Veneer: What You're Actually Selecting
Real wood veneer is a thin slice of hardwood, generally 0.5 to 3.0 mm thick, bonded to a backer for strength and workability. It is not printed laminate. Veneer retains natural pores and grain, which is why it finishes like solid wood.
Veneer lets you achieve the look of premium lumber on a stable core at a lower cost and material footprint. The market reflects this value, reaching $5.08 billion in 2026 and projected $7.9 billion by 2035.
You are also choosing a product category. Raw veneer holds about 32.5% of global share, and sustainability demand is rising, with 37% of LEED projects using sustainable wood veneers in 2023.
Five-step framework overview: 1) define environment and substrate, 2) select cut and pattern, 3) pick species and color, 4) set grade based on visibility, 5) choose backing and adhesive method.
Common pitfalls include picking species before checking moisture and substrate, ignoring cut types, and mismatching backers to tools or curves. A structured approach avoids these issues.
Prerequisites and Expected Outcomes
Prerequisites:
- Know the installation space category (dry, humid, or wet)
- Identify your substrate, such as MDF, particleboard, or Baltic Birch
- Confirm you can maintain 55–85°F and 30–55% RH for acclimation.
Expected outcomes: A cut, species, grade, and backer that match the environment and your tools. A sizing plan that supports your matching style, like book or slip. A finishing plan that accounts for open or closed pores.
Step 1: Define Your Project Requirements and Constraints
Start with the application and environment. Kitchens and baths are humid or wet zones and benefit from moisture-resistant backers like phenolic or sealed two-ply wood-on-wood. Typical living areas are dry zones, where paper-backed options are common.
Match the backer to the substrate. Standard 10 mil paper-backed veneers work on smooth cores like quality MDF, while 20 or 30 mil paper adds rigidity to span minor imperfections or for refacing, reducing telegraphing. Baltic Birch plywood is a premium substrate thanks to its dense, void-free core.
Plan your installation method. PSA peel-and-stick veneer is ideal when you want speed or need to avoid adhesive fumes. Paper-backed sheets pair with contact cement or PVA cold press glues, depending on your pressing setup.
Set budget and timeline directionally. Domestic species cost less and are more readily available than exotics, which can require longer lead times according to industry practice.
Substrate Compatibility Quick Picks
- Smooth MDF or particleboard: 10 mil paper backer for flat work with contact cement or PVA.
- Older cabinets or slightly uneven cores: 20 or 30 mil paper to limit telegraphing during refacing.
- Premium panels or furniture cores: Baltic Birch plywood for stability and clean edges.
- DIY, tool-light installs: PSA peel-and-stick backer to skip clamps and presses.
Step 2: Select Your Aesthetic Direction (Color, Grain, and Character)
Choose a color family first. White Oak lands in light to medium tans, Red Oak leans warm red-browns, and African Mahogany reads deeper, classic brown. Open-pore woods like Oak and Mahogany often need pore filler for a glass-smooth finish, while closed-pore species like Maple and Cherry build gloss quickly.
Decide on the grain feel. Cathedral patterns read traditional and warm, straight grain feels modern and calm, and figured or burl veneers become focal elements. Matching method changes the look too. Book match mirrors grain for symmetry on doors and tabletops, while slip match runs leaves in order to avoid the barber pole effect in cabinets.
Coordinate finishes and surrounding elements directionally. Use samples to check undertones against flooring and wall colors. When in doubt, order a small panel or sample set to test stain and sheen on site.
Step 3: Choose the Right Wood Species for Your Needs
Balance looks with performance and availability. Domestic staples like White Oak, Walnut, Cherry, Maple, Ash, and Hickory cover most aesthetic targets and are widely stocked. White Oak offers notable natural moisture resistance, which is why it excels on kitchen islands and bathroom vanities.
Exotics like Teak, Sapele, Zebrawood, Wenge, and Bubinga add drama and unique grain. Use them for statement pieces or accents where their visual impact earns the budget. Many buyers choose domestics for large runs and introduce exotics for focal panels according to industry practice.
If sustainability is a priority, veneer is an efficient use of timber. Adoption is rising, and 37% of LEED-certified projects used sustainable veneers for interiors in 2023.
Application Pairings
- High humidity vanities or islands: White Oak, quarter or rift for linearity and stability.
- Statement furniture fronts: Zebrawood or Wenge for bold contrast, based on design intent.
- Budget and availability: Domestic species often deliver better value and faster supply compared to exotics, a common industry pattern.
Step 4: Understand and Select Veneer Cut Types
Cut type changes the look more than species. Plain sliced, also called flat cut, follows tangential growth rings to create cathedral arches. Quarter cut slices perpendicular to the rings and, in Oak and Sycamore, exposes reflective fleck. Rift cut angles 15 to 30 degrees off the quarter to avoid medullary rays and produce very straight grain, which also lowers yield and raises cost.
Rotary cut peels the log like a roll, producing bold, variegated patterns. It is the most cost-effective method and the only way to get a single-piece face wide enough for a 48 inch panel in many species.
Grain rules and cost tie to standards too. For the highest architectural grade, WDMA requires at least a 3 inch leaf width for rift and quarter-cut AA faces, which helps maintain a consistent linear look across doors and panels.
Tip: If you like White Oak but want totally different vibes, compare plain sliced cathedrals for a traditional feel and rift or quarter for clean, contemporary lines.
When Each Cut Works Best
- Plain sliced: Warm, traditional cabinetry or furniture with cathedral figure.
- Quarter cut: Formal wall panels or doors where even straight grain and fleck are desired.
- Rift cut: Minimalist casework and long runs where comb grain reduces visual noise.
- Rotary cut: Bold, continuous faces on large panels at a value price point.
Step 5: Select Appropriate Veneer Grade and Quality Level
Grades describe face appearance and matching standards, not structural strength. AA is the top architectural face with near zero defects. A is high quality for most visible cabinetry and doors. B allows more variation or natural defects for a rustic look. C or Utility grades allow unlimited color variation and open defects for concealed interiors.
Standards bodies like WDMA and HPVA inform these rules. For instance, WDMA sets minimum leaf widths for premium rift and quarter-cut AA faces to maintain consistent linearity.
Smart budgeting uses grades strategically. Specify AA or A for focal faces like door fronts, and use B or C in hidden zones like cabinet boxes to control spend while protecting what people see most, a common pro practice.
Step 6: Choose the Right Backing System for Your Application
Backers set flexibility, stability, and adhesive choices. Standard paper-backed veneer typically combines about a 0.6 mm wood layer with paper for a total 0.8 to 1.2 mm sheet, compatible with contact cement or PVA cold press setups. Heavier 20 or 30 mil paper adds rigidity for refacing or rough cores.
Fleece backed, often called poly back, delivers excellent flexibility for tight radiuses and complex millwork. Phenolic backers bring maximum moisture resistance and toughness for commercial or wet areas, but they are too rigid for tight wraps. PSA, pressure sensitive adhesive, enables peel-and-stick installs and is ideal for tool-light refacing when you cannot handle solvent fumes.
If you prefer a wood feel at the edge and added stability, two-ply wood-on-wood is a solid choice. For experienced shops with vacuum presses, raw veneer supports traditional layup with custom cores, a path used for specialty builds.
| Backer | Typical thickness | Flexibility | Ideal uses | Notes |
|---|---|---|---|---|
| Paper 10 mil | ~0.8–1.2 mm total | Moderate | Flat doors, cabinets | Works with contact cement or PVA |
| Paper 20/30 mil | ~1.0–1.4 mm total | Lower | Refacing, rough cores | Reduces telegraphing on imperfect substrates |
| Fleece/Poly | Varies | High | Curves, radiuses | Exceptional flexibility for tight wraps |
| Phenolic | Varies | Low | Wet or high-traffic zones | High moisture resistance, avoid tight curves |
| PSA peel-and-stick | Varies | Moderate | DIY refacing | Tool-light installs, no wet glue needed |
| 2-ply wood-on-wood | Varies | Moderate | Sandable edges | Dimensional stability and wood edge feel |
Step 7: Determine Required Sheet Sizes and Quantities
Confirm panel dimensions, matching style, and seam layout before ordering. Standard architectural sizes include 2x4, 2x8, and 4x8. Extended 4x10 panels are available for tall wall runs where fewer seams are desired.
Account for your matching method. Book or slip matching needs a consistent run of leaves. For long, continuous grain across a room, order sequence-matched leaves pulled from a single flitch, which keeps color and figure aligned panel to panel.
Plan a directional waste factor based on layout complexity, door and drawer reveals, and the need to align cathedral peaks or straight grain across faces. When in doubt, consult before cutting to avoid shortfalls.
Pro Tip: Do Your Edges Match?
If your design shows edges, choose a matching edge banding in the same species and cut to maintain a clean visual line across doors and shelves.
Special Considerations for Specific Applications
Acclimation is non negotiable. Unroll sheets flat for 48 to 72 hours at 55 to 85°F and 30 to 55% RH. Match veneer and substrate moisture content within about 2 to 3 percent before bonding. Skipping this step is the number one cause of failure, leading to bubbles or cracks after cure.
For wet or commercial spaces, choose rigid, moisture resistant backers like phenolic or sealed two ply and test your finish system on scraps first. Veneer faces are thin, so avoid aggressive machine sanding that could cut through the wood layer.
Kitchen cabinets need moisture tolerance and easy cleaning. Furniture benefits from straight grain on drawer banks to align reveals. Large wall panels demand careful sequence matching and a fire rating strategy based on project specs, confirmed with your architect or AHJ.
Troubleshooting Tips
- Bubbles after press: Check acclimation window and moisture parity, then review adhesive open time and pressure.
- Telegraphing on refacing: Use a 20 or 30 mil paper backer to bridge slight substrate defects.
- Cracks on curves: Switch to fleece backed poly for tighter radiuses and avoid phenolic on wraps.
Making Your Final Decision: The Selection Checklist
Use this five step filter to finalize your spec: 1) Define environment and substrate. 2) Choose cut and pattern. 3) Select species and color. 4) Determine grade by visibility. 5) Select backing thickness and adhesive path.
Scenario example, kitchen refacing: Humid zone, existing boxes slightly uneven. Choose rift White Oak for calm linear grain. Specify A grade for doors, B or C for interiors. Pick 20 or 30 mil paper backer to limit telegraphing, or PSA for fast, tool-light installs.
Before ordering large quantities, request samples to confirm undertone, pore fill plan, and sheen. Ask suppliers about flitch numbers for sequence matching, acclimation requirements, and acceptable substrate flatness. Be cautious of vague grade labels without standards references or unclear backer specs.
Working with Total Wood Store: Your Veneer Selection Partner
We combine a wide species selection with practical guidance and fast, convenient online ordering. Product listings clearly state the species, cut, size availability, and backer type.
Need edges or accents to match your panels? Shop companion items like edge banding to finish doors, shelves, and case edges cleanly. For warm modern palettes, explore Teak plain sliced veneer options with consistent pores and color.
Not sure where to start? Use our five-step method and downloadable checklist to narrow choices, then request samples to confirm color and grain on site. We are here to answer questions on acclimation windows, backer selection, and matching strategies.
Frequently Asked Questions About Veneer Selection
What is the difference between veneer sheets and veneer plywood?
Veneer sheets are thin slices of real wood, typically 0.5 to 3.0 mm thick, supplied on a backer. Veneer plywood is a composite panel where those slices are already bonded to a core like MDF or particleboard.
Can I stain veneer after installation?
Yes. Real veneer accepts stain and finish like solid wood. Because the face is thin, test your stain and clear coat system on a scrap before full finishing.
Will veneer work on curved surfaces?
It depends on the backer. Fleece backed poly conforms to tight radiuses. Paper backers handle only slight curves. Phenolic is rigid and can crack on tight wraps.
What is the most durable veneer for high traffic areas?
Durability depends on species hardness and the finish system. Many shops choose straight grained White Oak for stability, then specify a tough topcoat, a common practice.
Do I need to acclimate veneer?
Yes. Rest sheets flat 48 to 72 hours at 55 to 85°F and 30 to 55% RH, and keep veneer and substrate moisture within about 2 to 3 percent before bonding.
Are there sustainable veneer options?
Yes. Sustainability is growing fast, and 37% of LEED certified projects used sustainable veneers in 2023.
How long does wood veneer last?
With proper care and finish upkeep, veneer can serve for decades according to industry experience.
What are typical lead times in 2026?
Lead times vary by species, cut, backer, and quantity. Domestic species and common backers are generally faster than exotics.
How much does pro installation cost vs DIY?
Costs vary widely by region, tools, and scope. PSA and paper backed sheets can reduce tooling needs for DIY, while complex layups often justify pro shops.
Conclusion
The surest path to a great veneer project is a simple sequence. Define the environment and substrate, then choose cut, species, grade, and backer that match your tools and space. Respect acclimation, 48 to 72 hours at controlled temperature and humidity, and keep moisture parity to avoid post cure issues.
Next steps: shortlist two cuts and two species, request samples, and test your finish stack on scraps. Use our five step checklist to finalize grades for visible faces and interiors, and confirm sizes and sequence matching before checkout. Ready to spec your project, explore Quartered White Oak, Teak, and matching edge banding at Total Wood Store, or contact us for quick guidance on backers and adhesives that fit your workflow.